
티스토리 뷰
MSA를 하면 당연히 어플리케이션 개수가 많아지고 그에 따라 어플리케이션마다 있는 설정 파일도 많아진다. 이렇게 되면 관리의 어려움이 생기고 이번에도 이런 관리의 어려움을 해결해주기 위해 Spring Cloud 형님들이 힘을 써주셨다. 사방에 나뉘어 있는 설정파일들을 모두 모아서 외부에서 한번에 관리할 수 있게 해주는, 또 변경이 되면 서버의 중단 없이 바로 반영까지 하게 해주는 Spring Cloud Config 라는 것을 통해서 말이다.
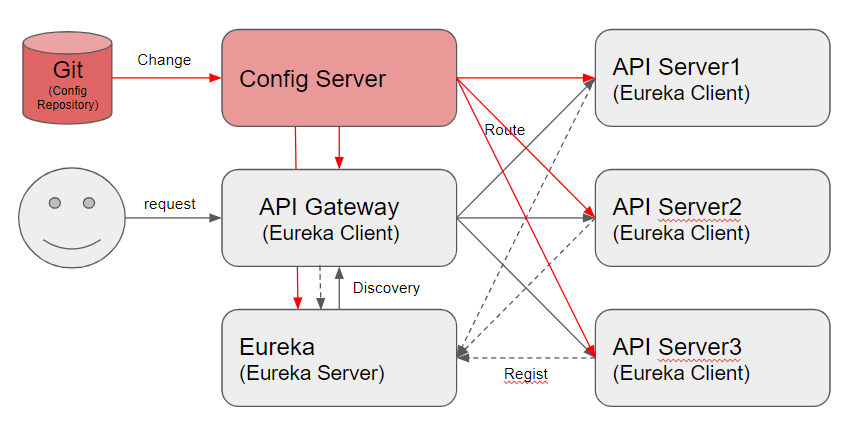
지금껏 구성했던 환경에 추가적으로 Config Server를 추가하였다. 모든 설정파일을 가지고 있는 Git에서 변경사항이 발생하면 이 변경된 Configuration properties가 Config Server를 거쳐 각각의 API Server에서 사용할 수 있도록 해준다. 이런 과정들에 대해서 기존에 구성한 환경을 토대로 간단하게 만들어보자.
Git repository
일단 github에 프로젝트를 하나 생성하자. 간단한 실습을 위해 public project로 생성한다. 프로젝트를 생성하고 난 후 설정파일 (properties or yml) 파일을 생성한다. 그리고 반드시 master branch임을 확인하자.
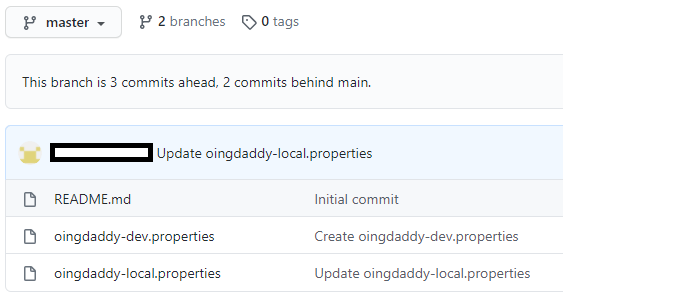
oingdaddy-local.properties, oingdaddy-dev.properties라는 이름으로 생성을 했고 안의 내용은 일단 아무거나 채워 넣는다. 파일명 뒤에는 profile을 넣는것이 규칙이다.
oingdaddy-local.properties
oingdaddy=msa beginneroingdaddy-dev.properties
oingdaddy=msa masterproperties 파일의 내용은 이렇게 대충 채우고 일단은 이렇게 Git Repository에서 할 작업은 마친다.
Spring Cloud Config Server
Eureka, Zuul을 생성했던 것과 마찬가지로 spring initializr 에 들어가서 Spring Cloud Config 프로젝트를 만들어본다.
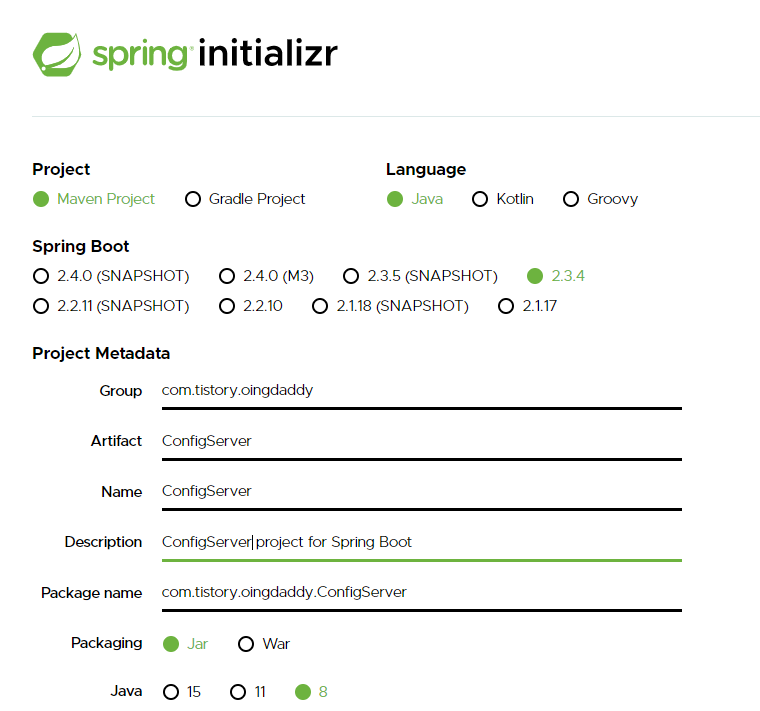
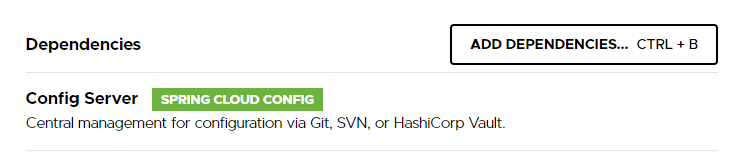
Maven 프로젝트로 만들고 dependency는 Config Server를 추가시켜준다.
그 다음 다운받은 Maven 프로젝트를 import 하는것은 지난 글을 참조한다.
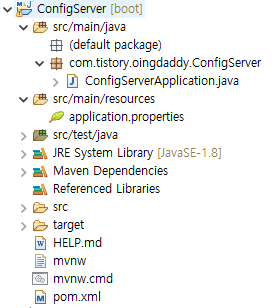
import를 다 하면 위와 같은 구조의 프로젝트가 생성된다. springboot 프로젝트이기에 전과 같은 동일한 구조로 생성이 되었다. 구성은 간단하다. ConfigServerApplication.java 파일과 application.properties, 그리고 pom.xml 정도 보면 된다.
ConfigServerApplication.java
package com.tistory.oingdaddy.ConfigServer;

import org.springframework.boot.SpringApplication;
import org.springframework.boot.autoconfigure.SpringBootApplication;
import org.springframework.cloud.config.server.EnableConfigServer;

@EnableConfigServer
@SpringBootApplication
public class ConfigServerApplication {

    public static void main(String[] args) {
        SpringApplication.run(ConfigServerApplication.class, args);
    }
}
@EnableConfigServer 를 추가해준다. 이 서버가 Config Server라는 것이다.
application.properties
server.port=8200
spring.application.name=config-server

spring.cloud.config.server.git.uri=https://github.com/oingdaddy/msastudy
주목해야 할점은 git uri 를 입력하는 부분인데 이곳에는 미리 properties (or yml) 파일을 올리기 위한 msastudy 라는 프로젝트를 생성해 놓았다. 이 프로젝트에 있는 설정파일들을 가지고 올거라는 뜻이다. 일단은 쉬운 예제를 위해 git public repo 에 프로젝트를 만들었고 만약 private 으로 만들고 그 설정파일을 가지고 오려면 여기를 보면 된다.
Config Server 쪽에서 할 일도 모두 끝났다. 기동을 해보자. 그리고 잘 불러오는지 확인을 해보자.
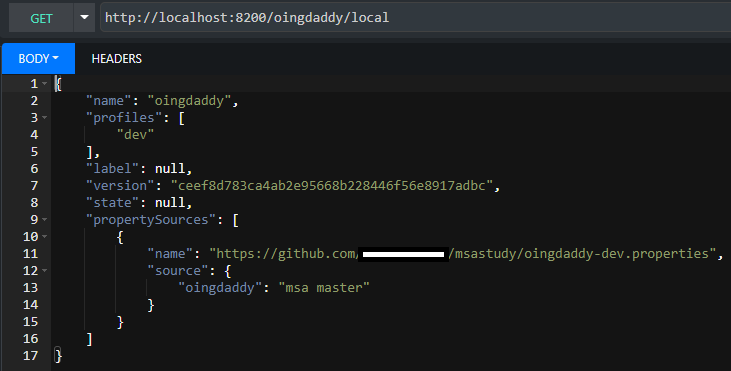
확인을 하는 방법은 위와 같이 http://localhost:8200/{filename}/{profile}으로 확인할 수 있다.
잘 불러온다. Config Server가 git으로부터 properties를 잘 불러오는것을 확인했다.
Spring Cloud Config Client
Spring Cloud Config Client는 기존에 만들었던 EurekaClient를 재사용을 한다. 추가시켜줘야할 의존성은 다음과 같다.
pom.xml
<dependency>
    <groupId>org.springframework.cloud</groupId>
    <artifactId>spring-cloud-config-client</artifactId>
</dependency>
<dependency>
    <groupId>org.springframework.boot</groupId>
    <artifactId>spring-boot-starter-actuator</artifactId>
</dependency>
<dependency>
    <groupId>org.springframework.boot</groupId>
    <artifactId>spring-boot-starter-web</artifactId>
</dependency>
Spring Cloud Config Client에서는 application.properties(yml) 대신 bootstrap.yml을 사용한다. application.properties 파일과 동일한 위치에 bootstrap.yml 파일을 생성해주고 다음과 같이 설정을 해주자.
bootstrap.yml
server:
  port: 8081

spring:
  application:
    name: oingdaddy
  cloud:
    config:
      uri:
      - http://localhost:8200

management:
  endpoints:
    web:
      exposure:
        include: refresh
spring.cloud.config.uri 부분에 Config Server의 정보를 넣어준다. 그리고 spring.appication.name은 이 어플리케이션의 이름이 아닌 불러올 파일 이름이다... 이부분에서 많은 시간을 허비했다. 그리고 뒤에 나올 refresh를 하기 위한 endpoint를 열어둔다.
설정은 모두 끝났고 이제 테스트를 하기 위한 SampleController를 만들어보자. 이것도 전에 만들어두었던 녀석을 조금 바꿔서 재활용을 해보자.
SampleController.java (EurekaClient1)
package com.tistory.oingdaddy.EurekaClient1.controller;

import org.springframework.beans.factory.annotation.Value;
import org.springframework.cloud.context.config.annotation.RefreshScope;
import org.springframework.web.bind.annotation.RequestMapping;
import org.springframework.web.bind.annotation.RestController;

@RefreshScope
@RestController
public class SampleContoller {

    @Value("${oingdaddy}")
    private String oingdaddy;

    @RequestMapping("/hello")
    public String printHelloWorld() {
        return "Hello MSA World! : 1st Client " + oingdaddy;
    }
}
properties에 넣었던 oingdaddy라는 값을 받아서 출력을 해주는 초간단 컨트롤러이다.
그리고 중요한점은 바로 @RefreshScope 어노테이션이다. 이 어노테이션이 붙은 클래스에는 변경된 설정파일의 설정이 애플리케이션의 재기동 없이 동적으로 반영되도록 해준다.
이제 Config Client 도 기동을 해보자. 항상 기동 순서는 Config Server가 먼저여야 하고 Config Client는 후순위다.
또한 spring profile도 지정을 해줘야한다. Boot Dashboard > 기동할 앱 우클릭 > OpenConfig 에서 Profile을 설정한다.
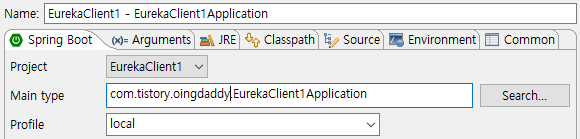
Profile에 일단 local을 입력하고 Apply > Run !
2020-10-08 23:03:50.711 DEBUG 9208 --- [           main] o.s.c.e.PropertySourcesPropertyResolver  : Found key 'spring.application.name' in PropertySource 'configurationProperties' with value of type String
2020-10-08 23:03:50.722  INFO 9208 --- [           main] c.c.c.ConfigServicePropertySourceLocator : Fetching config from server at : http://localhost:8200
2020-10-08 23:03:50.750 DEBUG 9208 --- [           main] o.s.web.client.RestTemplate              : HTTP GET http://localhost:8200/oingdaddy/local
2020-10-08 23:03:50.837 DEBUG 9208 --- [           main] o.s.web.client.RestTemplate              : Accept=[application/json, application/*+json]
2020-10-08 23:03:52.938 DEBUG 9208 --- [           main] o.s.web.client.RestTemplate              : Response 200 OK
2020-10-08 23:03:52.939 DEBUG 9208 --- [           main] o.s.web.client.RestTemplate              : Reading to [org.springframework.cloud.config.environment.Environment]
2020-10-08 23:03:52.949  INFO 9208 --- [           main] c.c.c.ConfigServicePropertySourceLocator : Located environment: name=oingdaddy, profiles=[local], label=null, version=50861d89e77dc728d543bce469f93f7ab70b7d5f, state=null
2020-10-08 23:03:52.950 DEBUG 9208 --- [           main] c.c.c.ConfigServicePropertySourceLocator : Environment oingdaddy has 1 property sources with 1 properties.
2020-10-08 23:03:52.950  INFO 9208 --- [           main] b.c.PropertySourceBootstrapConfiguration : Located property source: [BootstrapPropertySource@1988644427 {name='bootstrapProperties-configClient', properties={config.client.version=50861d89e77dc728d543bce469f93f7ab70b7d5f}}, BootstrapPropertySource@308889081 {name='bootstrapProperties-https://github.com/oingdaddy/msastudy/oingdaddy-local.properties', properties={oingdaddy=msa beginner}}]
202
기동을 하면 springboot banner가 출력되고 바로 Config Server로부터 fetch를 수행한다. 정상적으로 받는지 확인한다.
맨 마지막 줄을 보면 내가 원하는 파일을 정확하게 가지고 온 것을 확인할 수 있다. (로그레벨은 debug로 낮췄다)
브라우저에서 실제로 이 파일로부터 값을 잘 가지고 와서 바인딩을 하고 있는지 확인을 해보자.
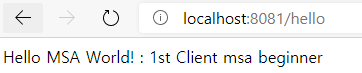
${oingdaddy} 라는 변수에 oingdaddy-local.properties 파일에 있던 msa beginner값이 정상적으로 들어가서 위의 값이 출력되는 것을 확인할 수 있다.
클라이언트에서도 모든 준비가 끝났다. 이제 정말 동적으로 설정파일을 변경하면 반영이 되는지 테스트를 해보자.
Spring Cloud Config 변경 후 동적반영 테스트
설정파일이 있는 github에 가서 oingdaddy-local.properties 파일을 변경해보자.
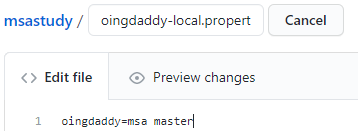
대충 이런식으로 oingdaddy의 값을 변경해 주었다. 기존은 beginner였다. 파일을 변경하고 commit & push 를 한다. 이떄 주의할점은 branch가 master로 되어 있는지 확인한다.
그리고 Client에서 이걸 반영을 받으려면 refresh를 해줘야 한다. 아까 Client에서 refresh endpoint를 열어두었으니 그것을 이용해서 refresh를 해준다. 꼭 POST METHOD로 요청을 해야 한다.
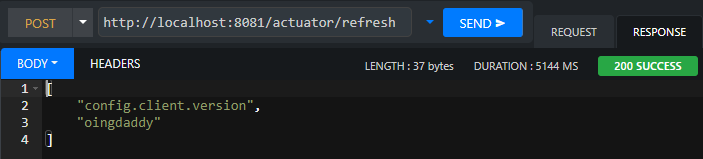
변경내역이 나오며 200 SUCCESS를 확인할 수 있다. 내가 바꾼 oingdaddy 도 바뀌었다고 잘 나온다.
이것을 날리면 Client 쪽 콘솔에 어플리케이션이 refresh 되는 과정이 나타난다. 마지막에 Completed 200 OK 가 나오면 성공이다. 이렇게 하고 다시 브라우저를 열고 localhost:8081/hello를 요청해본다.

begginer -> master 로 값이 잘 변경된 것을 확인할 수 있다. 뭔가 이 간단한거 하며 시행착오를 많이 겪었지만 그만큼 더 기억속에 오래 갔으면 좋겠다.
끝!
'DevOps > MSA' 카테고리의 다른 글
| [MSA] Hystrix Dashboard + Turbine 이용해서 Hystrix 모니터링 환경 구성하기 (0) | 2020.10.12 |
|---|---|
| [MSA 시작 #5] Netflix Hystrix를 이용한 Circuit Breaker 쉽게 구현하기 (0) | 2020.10.12 |
| Zuul application.properties Configuration 번역 (0) | 2020.10.08 |
| Eureka application.properties Configuration 번역 (0) | 2020.10.08 |
| [MSA 시작 #3] Spring Cloud Netflix Zuul 을 이용해 API Gateway 구성해보기 (0) | 2020.10.07 |