
티스토리 뷰
지난 포스팅으로 RabbitMQ를 설치하는 방법에 대해서 알아보았다. 이 설치한 RabbitMQ와 management를 띄워놓고 Springboot를 연동하여 비동기통신을 하는 간단한 샘플을 만들어보자. 설치에 앞서 간단한 개념을 알아보자.
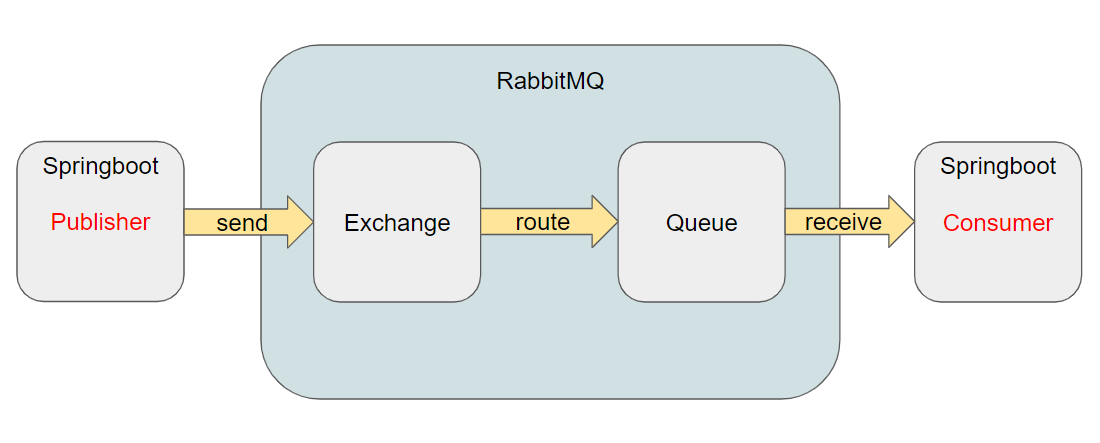
Publisher(=Provider) 라는 메세지 발생의 주체가 있고 메세지를 발생 시킨다. 메세지를 rabbitTemplate (restTemplate 같은 개념이라고 이해하면 됨. RabbitMQ와 통신을 쉽게 해준다.) 이라는 RabbitMQ의 API를 이용해 RabbitMQ 영역으로 보내면 이를 받아주는건 Exchange이다. 메세지를 보낼때 어느 Exchange로 보낼지에 대한 정보와 이 Exchange는 어느 Queue로 routing이 되야 하는지에 대한 정보도 함께 보낸다. 그래서 메세지는 Queue 영역에 가서 쌓이게 된다.
Consumer는 메세지를 RabbitMQ로부터 전달받을수도 요청을 해서 Queue에 있는 메세지를 fetch or pull 할수 있다.
사전작업
일단 샘플 프로젝트를 만들기 전에 RabbitMQ Management에 가서 Exchange와 Queue, Routing key를 생성해 놓자.
Exchange 생성

일단은 sample.exchange라는 exchange를 생성을 했다. Add a new exchange 를 통해 생성할 수 있다. 나머지 옵션은 일단 그대로 한다.
Queue 생성

Exchange와 Queue Binding 설정 (Routing)
Queue 목록이든 Exchange 목록이든 내가 생성한 것의 Name 을 누르면 상세 화면으로 연결이 된다.

그곳에는 Bindings 라는 것이 있고 이를 통해 Exchange와 Queue Binding 설정을 할 수 있다. 필자는 현재 Exchange를 통해서 들어와서 To queue 로 나오고 Queue로 들어간 사람은 From exchange 로 나온다. 연결할 정보를 입력하고 연결하기 위한 Routing key도 입력을 한다.
필자는 위에서 보다시피
Exchange : sample.exchange
Queue : sample.queue
Routing key : sample.oingdaddy.#
으로 RabbitMQ 설정을 마쳤다.
프로젝트 생성
일단 통신할 두개의 어플리케이션을 만든다. 역할에 따라 하나는 Publisher, 하나는 Consumer 로 만든다.
Spring Starter Project를 이용해 새로운 프로젝트를 생성해보자.


동일하게 만들어 주면 되고 일단은 이름만 다르다고 생각하면 된다.
Consumer
RabbitMQ Management가 있어서 뭐부터 시작을 해도 상관은 없지만 Consumer 부터 만들어보자.
application.properties
server.port=9080

spring.rabbitmq.host=localhost
spring.rabbitmq.port=5672
spring.rabbitmq.username=guest
spring.rabbitmq.password=guest
server의 포트를 지정해주고 RabbitMQ와 연동을 위한 기본적인 설정을 해준다.
Listener
import org.slf4j.Logger;
import org.slf4j.LoggerFactory;
import org.springframework.amqp.core.Message;
import org.springframework.amqp.rabbit.annotation.RabbitListener;
import org.springframework.stereotype.Component;

@Component
public class SampleListener {

    private static final Logger log = LoggerFactory.getLogger(SampleListener.class);

    @RabbitListener(queues = "sample.queue")
    public void receiveMessage(final Message message) {
        log.info(message.toString());
    }
}
Queue에 있는 정보를 받아주기 위한 Listener를 작성한다. amqp에서 제공하는 @RabbitListener가 있어서 아주아주 간편하게 Queue에 있는 정보를 받아올 수 있다. 본 예제는 RabbitMQ 영역에 있는 sample.queue 라는 Queue에 있는 메세지를 가지고 와서 logging 하라는 간단한 코드이다.
여기까지 구현이 되었다면 Consumer 구현은 끝난것이다. 어플리케이션 구동을 한번 해보자.

이런 기동로그가 나타날것인데 RabbitMQ 서버와의 Connection이 정상적으로 이루어진것을 확인할 수 있다.
그럼 이제 RabbitMQ Management 에 들어가서 이 Consumer App 이 잘 연결되었는지 한번 보자.

이렇게 ConsumerApp이 running state 로 연결이 잘 되어 있다.
그럼 이제 Consumer 쪽으로 메세지가 잘 들어가는지 테스트를 해보자. 테스트를 할때 Publisher는 필요없다. RabbitMQ management 에서 자체적으로 테스트를 할 수 있는 수단이 있다.
RabbitMQ management에서 Queues > sample.queue (방금 내가 만든 queue) 의 상세화면을 보면 하단에 다음과 같은 부분이 있다.
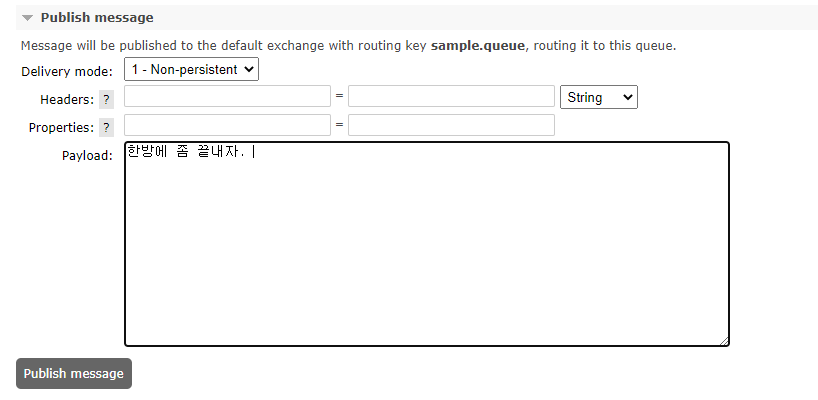
여기에 메세지를 아무거나 작성하고 Publish message를 눌러본다.

이런 alert 창이 나오면서 메세지가 발행이 되었다고 한다. 그리고 ConsumerApp 구현한 곳으로 돌아가서 Console log를 확인한다.
INFO 16444 --- [ntContainer#0-1] c.t.oingdaddy.consumer.SampleListener : (Body:'[B@7ec2332d(byte[25])' MessageProperties [headers={}, contentLength=0, receivedDeliveryMode=NON_PERSISTENT, redelivered=false, receivedExchange=, receivedRoutingKey=sample.queue, deliveryTag=1, consumerTag=amq.ctag-kSxtUJmc7r_jCSrxtyWA3g, consumerQueue=sample.queue])
이렇게 SampleListener가 발행된 메세지를 잘 받은 것을 확인할 수 있다.
Consumer 끝났다.
Publisher (Provider)
Publisher를 만드는것도 Consumer와 크게 차이가 나지 않는다.
application.properties
server.port=9081

spring.rabbitmq.host=localhost
spring.rabbitmq.port=5672
spring.rabbitmq.username=guest
spring.rabbitmq.password=guest
server의 포트번호만 ConsumerApp과 다르게 해주면 된다. 다른 RabbitMQ 설정은 동일하다.
Config.java
import org.springframework.amqp.core.Binding;
import org.springframework.amqp.core.BindingBuilder;
import org.springframework.amqp.core.Queue;
import org.springframework.amqp.core.TopicExchange;
import org.springframework.amqp.rabbit.connection.ConnectionFactory;
import org.springframework.amqp.rabbit.core.RabbitTemplate;
import org.springframework.amqp.support.converter.Jackson2JsonMessageConverter;
import org.springframework.amqp.support.converter.MessageConverter;
import org.springframework.context.annotation.Bean;

public class SampleConfig{

    private static final String EXCHANGE_NAME = "sample.exchange";
    private static final String QUEUE_NAME = "sample.queue";
    private static final String ROUTING_KEY = "sample.oingdaddy.#";

    @Bean
    TopicExchange exchange() {
        return new TopicExchange(EXCHANGE_NAME);
    }

    @Bean
    Queue queue() {
        return new Queue(QUEUE_NAME);
    }

    @Bean
    Binding binding (Queue queue, TopicExchange exchange) {
        return BindingBuilder.bind(queue).to(exchange).with(ROUTING_KEY);
    }

    @Bean
    RabbitTemplate rabbitTemplate(ConnectionFactory connectionFactory, MessageConverter messageConverter) {
        RabbitTemplate rabbitTemplate = new RabbitTemplate(connectionFactory);
        rabbitTemplate.setMessageConverter(new Jackson2JsonMessageConverter());
        return rabbitTemplate;
    }
}
사전작업에서 정한 exchange, queue, routing 등의 정보를 토대로 bean을 생성한다.
Controller.java
package com.tistory.oingdaddy.controller;

import org.springframework.amqp.rabbit.core.RabbitTemplate;
import org.springframework.beans.factory.annotation.Autowired;
import org.springframework.web.bind.annotation.GetMapping;
import org.springframework.web.bind.annotation.RestController;

@RestController
public class SampleController {

    private static final String EXCHANGE_NAME = "sample.exchange";

    @Autowired
    RabbitTemplate rabbitTemplate;

    @GetMapping("/sample/queue")
    public String samplePublish() {
        rabbitTemplate.convertAndSend(EXCHANGE_NAME, "sample.oingdaddy.#", "RabbitMQ + Springboot = Success!");
        return "message sending!";
    }
}
메세지를 발행해주는 역할을 하는 Controller이다. 브라우저에서 /sample/queue 라는 요청을 날리면 rabbitTemplate을 이용해 메세지를 보내고 화면에는 message sending! 이라는 것을 찍어준다.
여기까지 Publisher까지의 구현도 모두 끝났다. 이제 잘 되는지 확인을 해보면 된다.
일단은 이 Publisher도 RabbitMQ management에 잘 붙었는지 확인을 해보자.

Connection에 두개의 App이 붙은것을 확인할 수 있다.
Publisher 가 잘 되는지 확인하는 방법은 두가지가 있는데 첫번째는 위에서 Consumer 가 한것같이 RabbitMQ management 자체적으로 할 수 있다. 연결되어 있는 Consumer를 shutdown 시키고 Publisher만 연결해보자. 그리고 Controller에서 정의한대로 웹에 요청을 날려보자.
http://localhost:9081/sample/queue

브라우저에서는 return으로 설정한 값이 출력되며 Publisher가 날린 요청은 Exchange를 거쳐 sample.oingdaddy.# 이라는 routing key로 Queue에 접근하게 되어 쌓이게 된다.

Queue에서 Get Message 를 하면 Payload 부분에 Publisher가 보낸 메세지를 확인할 수 있다.
INFO 8860 --- [ntContainer#0-1] c.t.oingdaddy.consumer.SampleListener : (Body:'RabbitMQ + Springboot = Success!' MessageProperties [headers={}, contentType=text/plain, contentEncoding=UTF-8, contentLength=0, receivedDeliveryMode=PERSISTENT, priority=0, redelivered=false, receivedExchange=sample.exchange, receivedRoutingKey=sample.oingdaddy.#, deliveryTag=3, consumerTag=amq.ctag-WzHHoIGUROOUBQ2IFTJMig, consumerQueue=sample.queue])
그리고 다시 Consumer를 기동시키고 다시 Publisher에서 메세지를 날리고 Consumer에서 잘 받아지는지 확인을 하는 방법이다. 보낸 메세지가 Consumer에서 잘 받아진것을 확인할 수 있다.
간단한 RabbitMQ + Springboot 연동 테스트가 끝났다.
끝!
'Framework > Spring' 카테고리의 다른 글
| Springboot application.yml 파일의 값 가져오기 (feat. @Value is null) (3) | 2020.10.30 |
|---|---|
| Springboot + embedded hsqldb 로 간단히 샘플 프로젝트 만들기 (0) | 2020.10.20 |
| springboot 기동 후 바로 종료되는 에러 [extShutdownHook] s.c.a.AnnotationConfigApplicationContext 해결방법 (0) | 2020.10.08 |
| Springboot embedded tomcat Session Clustering (JAVA config) (0) | 2020.09.25 |
| Spring properties 파일의 내용 암호화하기 (with Jasypt) (0) | 2020.08.26 |