
티스토리 뷰
MinIO JAVA API 사용하는법 예제를 통해 쉽게 알아보기
지난번까지 MinIO를 설치하고 어떻게 사용하는지에 대해서 살펴보았다. 물론 그냥 MinIO Browser 자체를 사용하는 사람도 있을거라 생각하지만 이것만 사용하는것은 앙꼬없는 찐빵같은 것이다. 어플
oingdaddy.tistory.com
지난번에 MinIO JAVA API를 사용하는 방법에 대해서 알아보았다. bucket control 하는 방법에 대해서 예제를 통해 봤는데 file upload도 이와 거의 흡사하다.
TestMinIO.java (file upload 1)
public class TestMinIO {

    public static void main(String[] args) {
        try {
            MinioClient minioClient = new MinioClient("ip:port", "ID", "암호");
            boolean found = minioClient.bucketExists("sample");
            if (!found) {
                minioClient.makeBucket("sample");
                System.out.println("sample bucket is create successfully");
            } else {
                System.out.println("sample bucket already exist");
            }

            minioClient.putObject("sample","testfile.zip", "C:/temp/testfile.zip", null, null, null, null);

         } catch (Exception e) {
             System.out.println("Error occurred: " + e);
         }
    }
}
MinIO API를 사용하기 위해 minioClient 객체를 만들고 bucket 검사를 하고 putObject를 수행한다. 입력해야 할 param이 7개나 있는데 각 param의 속성은 다음과 같다. (앞에서부터 순서대로)
@param bucketName Bucket name.
@param objectName Object name to create in the bucket.
@param fileName File name to upload.
@param size Size of all the data that will be uploaded.
@param headerMap Custom/additional meta data of the object.
@param sse encryption metadata.
@param contentType Content type of the stream.
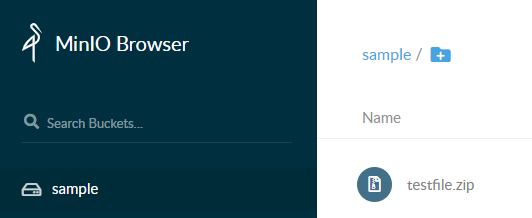
실행을 하면 위와 같이 파일이 잘 업로드가 된 것을 확인할 수 있다.
하지만 위와 같이 특정 경로에 있는 파일을 바로 업로드하는 경우는 거의 없다. 보통은 화면단에서 넘어온 Multipart File 형식으로 받아서 그 파일을 InputStream 형식으로 변환하여 업로드를 진행한다. 이 경우에는 다음 API를 사용한다.
MinioClient.java (lib에서 제공됨.)
public void putObject(String bucketName, String objectName, InputStream stream, Long size,
    Map<String, String> headerMap, ServerSideEncryption sse, String contentType)
3번째 파라미터값만 fileName에서 stream으로 바뀌었다. 여기에 맞게 넣어주면 된다.
위의 내용을 토대로 실제로 프로젝트에서 활용이 되는 예제를 작성해보려 한다. Multipart File은 화면단으로부터 넘어오는 정보이고 이것을 받아주는 Controller와 Service, Repository 등의 구현도 필요하다. 이에 대한 예제는 이 포스팅을 참조하도록 하자. spring에서 fileupload에 대해 자세하게 나와있다. 이 포스팅을 보면 FileUploadService에서 writeFile(multipartFile, saveFileName); 하는 부분이 있는데 이 부분대신에 아래와 같은 메소드를 하나 만들어서 적용을 해주면 된다.
file upload method
public boolean putObject(String bucket, String objectName, InputStream stream) {
    boolean result = false;
    try {
        MinioClient minioClient = new MinioClient("ip:port", "ID", "암호");
        boolean found = minioClient.bucketExists(bucket);
        if (found) {
            minioClient.putObject(bucket, objectName, stream, null, null, null, null);
            result = true;
        }
    } catch (Exception e) {
        System.out.println("Error occurred: " + e);
    }
    return result;
}
파일 업로드 하는것을 조금만 응용하면 MinIO 서버에 올라간 파일을 가지고 올수도 삭제를 할수도 있다.
file remove method
public boolean removeObject(String bucket, String filepath) {
    boolean result = false;
    try {
        MinioClient minioClient = new MinioClient("ip:port", "ID", "암호");
        boolean found = minioClient.bucketExists(bucket);
        if (found) {
            minioClient.removeObject(bucket, filepath);
            result = true;
        }
    } catch (Exception e) {
        System.out.println("Error occurred: " + e);
    }
    return result;
}
file get method
public byte[] getObject(String bucket, String filepath) {
    byte[] result = null;
    try {
        MinioClient minioClient = new MinioClient("ip:port", "ID", "암호");
        boolean found = minioClient.bucketExists(bucket);
        if (found) {
            result = IOUtils.toByteArray(minioClient.getObject(bucket, filepath));
        }
    } catch (Exception e) {
        System.out.println("Error occurred: " + e);
    }
    return result;
}
지금까지 Minio에서 제공하는 bucket operation의 일부와 object operation의 일부를 살펴봤다.
끝!
'Server > Storage' 카테고리의 다른 글
| Minio Unable to initialize config system: Invalid credentials (0) | 2020.10.28 |
|---|---|
| MinIO "Detected default credentials 'minioadmin:minioadmin', please change the credentials immediately" 오류 (0) | 2020.09.23 |
| MinIO API 사용하는법 예제를 통해 쉽게 알아보기 (0) | 2020.09.22 |
| MinIO bucket 생성 및 파일 업로드 해보기 (0) | 2020.09.21 |
| MinIO config.json을 통해 계정 초기화하는 방법 (0) | 2020.09.17 |