티스토리 뷰
이전 포스팅까지는 Thymeleaf 의 문법을 위주로 보았다면 이번에는 layout 을 구성하는 방법에 대해서 알아보겠다. 기존에는 tiles를 활용하여 이런 layout을 구성하고는 했는데 Thymeleaf를 사용해서도 가능하다. 다재다능한 녀석이다.
Layout 구성을 위해서 일단은 dependency를 하나 추가해줘야한다.
pom.xml
<dependencies>
  <dependency>
    <groupId>org.springframework.boot</groupId>
    <artifactId>spring-boot-starter-thymeleaf</artifactId>
  </dependency>
  <dependency>
    <groupId>org.springframework.boot</groupId>
    <artifactId>spring-boot-starter-web</artifactId>
  </dependency>

  <dependency>
    <groupId>nz.net.ultraq.thymeleaf</groupId>
    <artifactId>thymeleaf-layout-dialect</artifactId>
  </dependency>

</dependencies>
thymeleaf-layout-dialect 라는 dependency가 새롭게 추가가 되었다. 이름부터 layout이 붙어있다.
이제 예제를 통해 설명을 하려는데 Content에 해당하는 녀석은 전에 포스팅에서 잠깐 나왔던 허접한 fruit.html 이다. 이 html 파일 전후로 header와 footer를 넣는 아주아주 간단한 layout을 만들어 보려고 한다.
fruit.html (Controller는 여기를 참조)
<!DOCTYPE html>
<html>
<head>
<meta charset="UTF-8">
<title>thymeleaf sample</title>
</head>
<body>
    ${...} 변수 표현식 <br/>
    <span th:text="${fruit.fruit1}"></span><br/>
    <span th:text="${fruit.fruit2}"></span><br/>
    <span th:text="${fruit.fruit3}"></span><br/><br/>

    ... 생략 ...

</body>
</html>
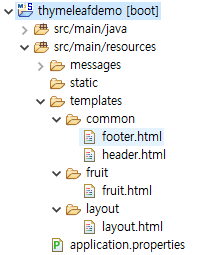
대략 이렇게 생겼고 이것에 살을 붙여 나갈 계획이다. 일단은 layout html 파일과 header와 footer 를 하나씩 만들어 보자. 구조는 다음과 같이 잡으면 된다.
header.html
<!DOCTYPE html>
<html>
<head>
<meta charset="UTF-8">
<title>sampleheader</title>
</head>
<body>
    <div th:fragment="sampleheader">
      ===================== this is header! ======================
    </div>
</body>
</html>
footer.html
<!DOCTYPE html>
<html>
<head>
<meta charset="UTF-8">
<title>samplefooter</title>
</head>
<body>
    <div th:fragment="samplefooter">
      ===================== this is footer! ======================
    </div>
</body>
</html>
fruit.html (content 정의, 실제 구현할 업무화면이라고 생각하면 된다.)
<!DOCTYPE html>
<html xmlns="http://www.w3.org/1999/xhtml"
      xmlns:th="http://www.thymeleaf.org"
      xmlns:layout="http://www.ultraq.net.nz/thymeleaf/layout"
      layout:decorator="layout/layout">

<head>
<meta charset="UTF-8">
<title>thymeleaf sample</title>
</head>
<body>
    <div layout:fragment="content">
        ${...} 변수 표현식 <br/>
        <span th:text="${fruit.fruit1}"></span><br/>
        <span th:text="${fruit.fruit2}"></span><br/>
        <span th:text="${fruit.fruit3}"></span><br/><br/>
    </div>

</body>
</html>
문서의 맨 앞에 layout이라는 속성을 정의를 했다. 아까 pom.xml에서 새로이 추가한 thymeleaf-layout-dialect 의 기능이라고 보면 된다. 또 layout:decorator 부분에는 이 문서가 쓸 layout 을 정의해줘야한다. layout/layout은 layout 디렉토리 밑에 있는 layout.html 을 가리킨다고 보면 된다.
문서의 body부에 layout:fragment="content" 라고 정의를 해준다. 그리고 그 안에 content를 작성을 한다. html 파일마다 이렇게 해줘야한다. 이 부분이 thymeleaf layout을 사용하는데 있어서 가장 불편한 점이라고 생각한다.
layout.html
<!DOCTYPE html>
<html lagn="ko"
      xmlns:th="http://www.thymeleaf.org"
      xmlns:layout="http://www.ultraq.net.nz/thymeleaf/layout">
<head>
<meta charset="UTF-8" />
<title>thymeleaf layout</title>
</head>

<body>
<!-- header -->
<th:block th:replace="common/header::sampleheader"></th:block>

<!-- content -->
<th:block layout:fragment="content"></th:block>

<!-- footer -->
<th:block th:replace="common/footer::samplefooter"> </th:block>
</body>

</html>
header, footer, content 등 화면 구성에 필요한 요소들을 이곳저곳에 정의를 했다면 이 layout.html 에 이것들을 조합을 해서 표현을 해줘야한다. 위에서 나온 layout/layout 과 마찬가지로 여기에 나오는 common/footer 이런 표현은 common 디렉토리에 있는 footer.html 을 뜻한다. 이 footer.html에 정의된 fragment 중 samplefooter 를 이곳으로 가지고 오라는 표현이다.
이렇게 모든 파일을 완성하고 어플리케이션을 기동하고 결과를 확인해보면
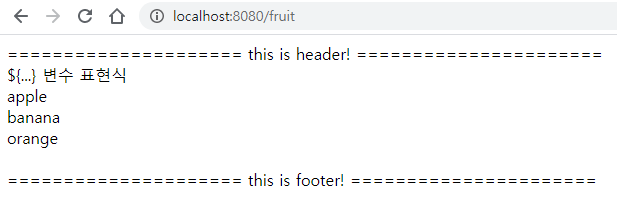
이렇게 원하는대로 화면이 구성된것을 확인할 수 있다. 이런식으로 화면 공통으로 사용할 css, javascript 등을 fragment로 정의하여 layout에 적절하게 배치하여 화면을 만들 수 있다.
끝!
'Lang > Thymeleaf' 카테고리의 다른 글
| [Thymeleaf 시작 #3] Thymeleaf 에서 지원하는 API (Base objects 및 Utility Objects) (0) | 2020.08.19 |
|---|---|
| [Thymeleaf 시작 #2] Thymeleaf 기본 사용법, 문법 예제 (0) | 2020.08.19 |
| [Thymeleaf 시작 #1] Thymeleaf 사용하는 프로젝트 만들어보기 (0) | 2020.08.19 |