티스토리 뷰
Sonarqube는 정적으로 분석'된' 정보를 보여주는 역할을 하는 것이라면 Sonar-Scanner는 분석을 해주는 역할을 한다고 이해하면 된다. 이를 설치하고 연동하는 방법에 대해서 가이드하고자 한다.
Sonarqube 설치
일단 Sonarqube는 다음 글들을 참조하여 설치하도록 하자.
AWS ec2에 sonarqube 설치하기
앞서 AWS ec2에 git, gitlab도 설치하고 Jenkins도 설치했었다. CI/CD가 구성되면 그다음은? 품질이다. 정적 소스 분석도구인 Sonarqube를 설치해보자. 기본적으로 java가 설치가 되어 있어야 하는데 이건 Jenk
oingdaddy.tistory.com
Sonarqube Windows10 환경에서 설치하기
사양이 좋은 컴퓨터를 받아서 로컬에 sonarqube를 설치하고 정적분석을 해보기로 하였다. Windows 환경에서 설치를 하는건 개인적으로는 Linux 환경에 설치하는것보다 조금 까다로웠다. 설치 Download |
oingdaddy.tistory.com
Sonar-Scanner 설치
SonarScanner | SonarQube Docs
Caching scanner files To prevent SonarScanner from re-downloading language analyzers each time you run a scan, you can mount a directory where the scanner stores the downloads so that the downloads are reused between scanner runs. On some CI systems, you a
docs.sonarqube.org
Sonar-Scanner는 이곳에서 다운받을 수 있다.

윈도우 환경에서 진행을 할거라 윈도우용으로 다운로드 받겠다. 원하는 환경의 파일을 받으면 된다. 다운을 받아서 적당한 곳에 압축을 풀어준다.

압축을 풀면 위와 같은 모습을 확인할 수 있고 설치는 모두 끝났다.
Sonar-Scanner 설정
sonar-scanner 설정은 기본적으로 sonar-scanner설치경로/conf/sonar-scanner.properties 파일에서 한다.
#Configure here general information about the environment, such as SonarQube server connection details for example
#No information about specific project should appear here

sonar.login=admin
sonar.password=admin

sonar.projectKey=template-project
sonar.projectName=template-project
sonar.projectVersion=1.0
sonar.sourceEncoding=UTF-8
sonar.projectBaseDir=C:/workspace/template-project
sonar.host.url=http://localhost:9000

sonar.binaries=C:/workspace/template-project/bin

#DB 연동하는 경우
#sonar.jdbc.url=url정보
#sonar.jdbc.driver=드라이버명
#sonar.jdbc.username=ID
#sonar.jdbc.password=password
이런식으로 어떤 소스를 분석하여 어느 Sonarqube에 올릴지에 대한 정보를 property 형식으로 작성하면 된다.
여러 모듈에 대해서 분석을 하고 싶다면 아래 글을 참조하도록 하자.
Jenkins에 Sonarqube 연동하기
Jenkins와 Sonarqube 연동을 하려면 일단 Jenkins와 Sonarqube가 설치가 되어 있어야 한다. 각각의 설치 과정은 생략하도록 하겠다. 이 두개의 어플리케이션이 설치가 되어 있다는 가정하에 설명을 하도록
oingdaddy.tistory.com
Sonar-Scanner 실행
이런식으로 properties 파일의 작성을 마치면 그다음은 실행을 해보는것이다. 실행방법은 간단하다.
sonar-scanner설치경로/bin/sonar-scanner.bat 을 누르면 실행이 된다.

아니.. 근데 뭐 이 작은거 돌리는데 8분이 걸리는건지... 아무튼 성공했다.
다시 Sonarqube로 돌아가 새로고침 한번 해보면
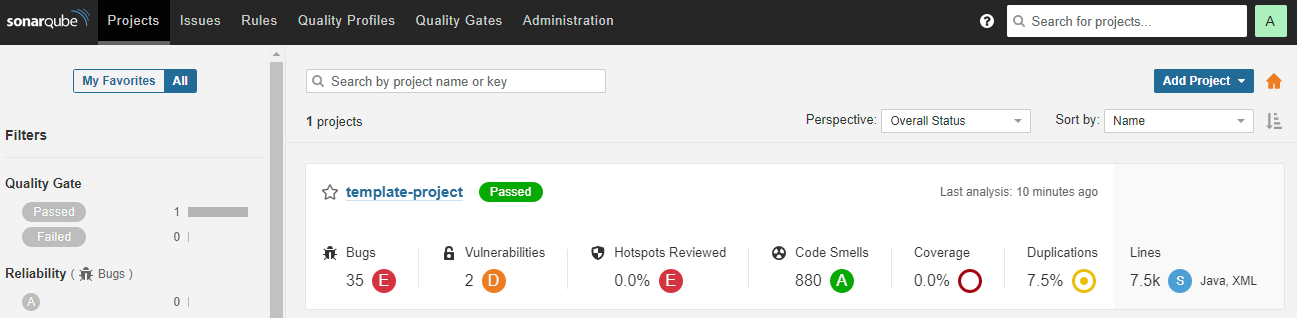
Sonar-Scanner를 통해 분석한 프로젝트가 이렇게 올라간것을 확인할 수 있다.
끝!
'CI,CD > Sonarqube' 카테고리의 다른 글
| Sonarqube required java 11 to run 조치 방법 (0) | 2022.02.18 |
|---|---|
| Sonar-Scanner 실행시 Malformed \uxxxx encoding 오류 조치 (2) | 2021.12.24 |
| Sonarqube 설치시 org.elasticsearch.ElasticsearchException: java.lang.InterruptedException 조치 (0) | 2021.12.24 |
| Sonarqube Windows10 환경에서 설치하기 (0) | 2021.12.24 |
| AWS ec2에 sonarqube 설치하기 (0) | 2021.08.11 |